

How to prepare a Mac for sale or a return to an employer

consent.ads.queue.push(function(){
try {
IDG.GPT.addDisplayedAd(“gpt-superstitial”, “true”);
$(‘#gpt-superstitial’).responsiveAd({screenSize:’971 1115′, scriptTags: []});
IDG.GPT.log(“Creating ad: gpt-superstitial [971 1115]”);
}
catch (exception) {
console.log(“Error with IDG.GPT: ” + exception);
}
});
When you need to give up or sell a Mac, how can you make sure you keep what you need and leave a wiped machine?
“);
});
try {
$(“div.lazyload_blox_ad”).lazyLoadAd({
threshold : 0, // You can set threshold on how close to the edge ad should come before it is loaded. Default is 0 (when it is visible).
forceLoad : false, // Ad is loaded even if not visible. Default is false.
onLoad : false, // Callback function on call ad loading
onComplete : false, // Callback function when load is loaded
timeout : 1500, // Timeout ad load
debug : false, // For debug use : draw colors border depends on load status
xray : false // For debug use : display a complete page view with ad placements
}) ;
}
catch (exception){
console.log(“error loading lazyload_ad ” + exception);
}
});
When it’s time to give up a Mac, you typically don’t want to give up its secrets—your private and personal data—when it goes. This can be at the time you sell it, or, in the case of Macworld reader Dane, when you leave a job and you need to return the Mac to your employer. (You might be asked to return a computer even while you keep a job, too, of course.)
Not preparing a computer before you return it can sometimes have consequences. A friend returned a work machine and was eventually paid a visit by police. His previous employer had examined the web history of the computer returned, and found a set of searches about news and travel they decided were suspicious but that had been conducted innocently and separately by different members of the household.
How to preapre a Mac for sale
If it’s your own computer, here are the easiest set of steps you can take to prep the machine.
- Make a clone via SuperDuper!, Carbon Copy Cloner, or Disk Utility (while booted into macOS Recovery), or choose to start a Time Machine backup to make sure you have all the latest data. You can then migrate it to a new Mac, or keep it on hand for later retrieval.
- If you have a firmware password set, remove it.
- Boot into macOS Recovery and erase the drive via Disk Utility, then reinstall the latest version of macOS the computer can handle. (See “More on erasure,” below.)
- Set up a basic account you can hand over to the next owner.
- Restart to make sure that everything works as expected.
Preparing a Mac for return
If it’s a work computer, you may be in a tricky position if you back up all the data, as you may be retaining information that your employer considers proprietary or a trade secret. In some states and circumstances, even if you never intended to do anything with the data, just the possession of it could wind up being a problem. (This is not legal advice, but you can find many news stories in which retention of data without intent still causes people legal costs and lots of trouble.)
This means you should first get rid of any data related to the business that you’re sure you or your employer has copies of. For total clarity, you might consult with your employer or the IT department about what data they want to retain and make sure that’s copied off the Mac.
It’s most likely you have documents scattered in a few places, depending on how you’ve used the Mac.
Mail is the most difficult to manage. Any messages stored in Apple Mail in the On My Mac section of the Mailbox left-navigation bar. will be deleted when you erase the Mac, as they’re no longer stored on the mail server. I recommend, after confirming all work messages are appropriately copied elsewhere, removing the work email accounts from Mail, and then deleting any work email folders from On My Mac.
Once that’s done and you’ve emptied the Mail trash, you can copy your mail to a backup drive or over a network. You don’t need to do this for any messages stored on your various account servers. Apple offers instructions for exporting mailboxes, but you can also dive into ~/Library/Mail/ (in the Finder, choose Go > Go To Folder, and paste that path in). You can copy the folder starting with V (V5 for the latest version of Mail) and then import those mailboxes on a different Mac. You can find more advice on this in a recent column I wrote about recovering mail.
Now look at other locations in your Home account and Shared folders, like Documents, Downloads, Movies, Music, and Pictures.
Once you’re sure you’ve copied everything for work and yourself, you can carry out steps 2 to 5 above, and then return the computer.
More on erasure
Formatting a computer drive isn’t the same as erasing all the data from it. Rather, Disk Utility (and similar apps for other operating systems) just change all the catalogs and other details that track where the data was. It remains in place, and can be found in fragments or as whole files via data-recovery tools or specialized forensics ones.
 IDG
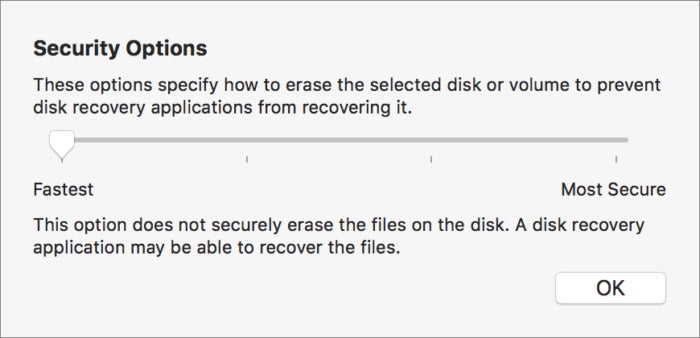
IDGFor hard disk drives, you can use secure erase to overwrite data repeatedly and render it effectively impossible to recover.
If you’re concerned out of privacy that your data is gone for good, you have a few options:
- If you have FileVault enabled, you don’t need to worry. Erasing the drive via Disk Utility discards the encryption key used to encode data, and it effectively makes all your files unrecoverable. Good job!
- SSDs store data in a manner that’s designed to keep wear even on the memory cells that made up solid-state storage. As a result, once a drive is reformatted and a substantial amount of new data written to it, the old information is difficult to impossible to retrieve. (This is why it’s critical to use FileVault from the start with SSDs and hybrid SSD/hard drives like Fusion Drives, to make it virtually impossible.)
- Disk Utility offers a secure erase option when formatting a drive (click the Security Options button), but this is only recommended for hard disk drives.
Ask Mac 911
We’ve compiled a list of the questions we get asked most frequently along with answers and links to columns: read our super FAQ to see if your question is covered. If not, we’re always looking for new problems to solve! Email yours to mac911@macworld.com including screen captures as appropriate, and whether you want your full name used. Every question won’t be answered, we don’t reply to email, and we cannot provide direct troubleshooting advice.