

How to remove your FileVault recovery key from iCloud
consent.ads.queue.push(function(){
try {
IDG.GPT.addDisplayedAd(“gpt-superstitial”, “true”);
$(‘#gpt-superstitial’).responsiveAd({screenSize:’971 1115′, scriptTags: []});
IDG.GPT.log(“Creating ad: gpt-superstitial [971 1115]”);
}
catch (exception) {
console.log(“Error with IDG.GPT: ” + exception);
}
});
You can use Apple iCloud for escrow, but here’s how to store the key stored locally if you change your mind.
Apple
“);
});
try {
$(“div.lazyload_blox_ad”).lazyLoadAd({
threshold : 0, // You can set threshold on how close to the edge ad should come before it is loaded. Default is 0 (when it is visible).
forceLoad : false, // Ad is loaded even if not visible. Default is false.
onLoad : false, // Callback function on call ad loading
onComplete : false, // Callback function when load is loaded
timeout : 1500, // Timeout ad load
debug : false, // For debug use : draw colors border depends on load status
xray : false // For debug use : display a complete page view with ad placements
}) ;
}
catch (exception){
console.log(“error loading lazyload_ad ” + exception);
}
});
FileVault offers the fantastic option in macOS to encrypt your entire drive. With modern Macs, starting now several years ago, that whole-disk encryption allows nearly the same performance as with an unencrypted drive due to hardware-based accelerated cryptographic calculations.
To avoid losing your files forever if you forget your password or lose it from a stored location, macOS offers to either reveal to you a special Recovery Key that you have to make a record of, or—starting with Yosemite—lets you use iCloud to unlock your drive. (There’s a special Mavericks-only option that requires answering security questions; read this Apple support note for details, especially the footnote at the end.)
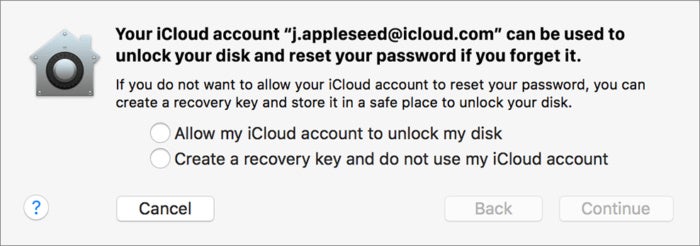 Apple
AppleApple gives you the option to escrow your Recovery Key.
The Recovery Key works at a “cold” startup after your Mac has been shut down when you’re prompted to log into an account that you’ve enabled for FileVault access. At that stage, you can click a question mark and enter your Recovery Key to reset the password for the account. With iCloud escrow for recovery, you log into your iCloud account.
Macworld reader Ester set up iCloud as the option for their Mac’s FileVault recovery, and now wants to change it. What’s the process for doing this?
It’s tedious, but rightly so. Apple doesn’t allow a way to switch from escrow to personal control. Instead, you have to decrypt your drive, then re-enable FileVault.
- In the Security & Privacy system preference pane click the FileVault tab.
- Click the lock icon at the lower left and enter an account name and password with administrative access.
- Click the Turn Off FileVault button.
- Confirm you want to disable FileVault by clicking Restart & Turn Off Encryption.
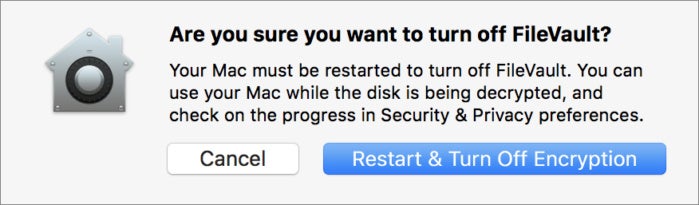 IDG
IDGDisable FileVault as the first step to changing the Recovery Key.
- Your Mac now restarts and after you log back in and it starts up, it begins decrypting the entire contents of the drive. This can take a while.
- When it’s completed, you’ll be able to return to the FileVault tab and click Turn On FileVault.
- At the Recovery Key prompt, choose Create a Recovery Key and Do Not Use My iCloud Account.
- Write that key down or otherwise make a permanent record of it!
- Once again, you’ll restart and after your Mac is back up and running, it begins encrypting everything on the drive.
This is the same process to use, by the way, if you lose your Recovery Key.
Ask Mac 911
We’ve compiled a list of the questions we get asked most frequently along with answers and links to columns: read our super FAQ to see if your question is covered. If not, we’re always looking for new problems to solve! Email yours to mac911@macworld.com including screen captures as appropriate, and whether you want your full name used. Every question won’t be answered, we don’t reply to email, and we cannot provide direct troubleshooting advice.