

How to set up an external drive as a Time Machine destination for multiple Macs

Step-by-step directions on connecting Macs to a shared hard drive for backup.
Apple
“);});try{$(“div.lazyload_blox_ad”).lazyLoadAd({threshold:0,forceLoad:false,onLoad:false,onComplete:false,timeout:1500,debug:false,xray:false});}catch(exception){console.log(“error loading lazyload_ad “+exception);}});
Ed Bernard has all the right pieces, but wasn’t able to find a straightforward explanation for backing up his three Macs to a single external drive that he’s attached to one of them. Here’s how to do that.
First, Attach the hard drive to the Mac you want to act as the Time Machine “hub.” This should be a desktop machine and, preferably, one that’s connected via ethernet to your home network. Wi-Fi will work, but the amount of backup data passing over even the latest, fastest Wi-Fi flavor may bog down other simultaneous network activity.
Even if only your Time Machine destination Mac connects to a base station via ethernet, that still halves the amount of backup data that passes over Wi-Fi—it’s transmitted from a Mac to the base station over Wi-Fi, and then from the base station via ethernet to the destination Mac.
Second, make sure your external volume has been formatted ideally for Time Machine. I wrote a column earlier this year that explains the formatting issues for local and networked volumes.
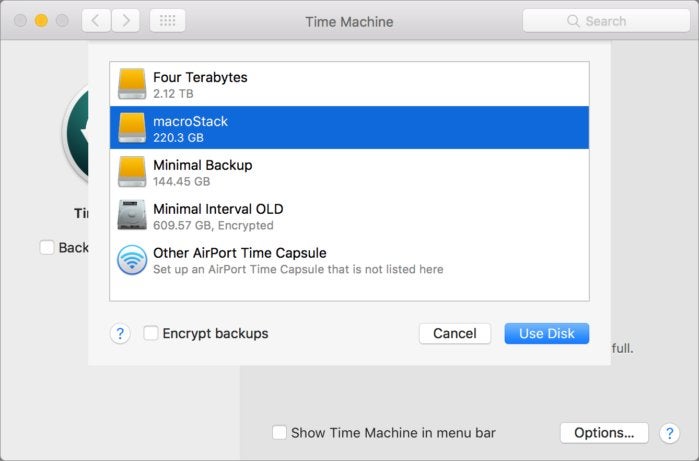
Now, set up Time Machine to use this external drive.
 IDG
IDGMount the Time Machine volume in the Finder.
Next, you need to make sure this Mac has file sharing enabled. Open the Sharing system preference pane, and make sure File Sharing is checked. Click the Options button to make sure that AFP is enabled. (Apple says in a 2016 support document that SMB isn’t supported, but in a 2017 one covering Sierra, it says SMB is.)
On each Mac you want to back up to the external drive on your target Mac:
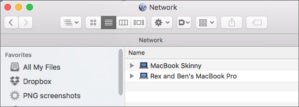
- In the Finder, choose Go > Network (Command-Shift-K).
- Double-click the Mac in the Network view.
- Enter an account name and password from the other Mac if prompted. (If you’ve stored information, a list of drives and folders appears.)
- Double click the Time Machine volume to mount it in the Finder.
- In the Time Machine preference pane, click Select Backup Disk and choose the network-mounted volume.
- Repeat steps 1 to 5 for other Macs.
 IDG
IDGYou can select a Finder-mounted networked drive just as easily as a local volume as a Time Machine destination.
If, in step 2, you don’t see the destination Mac as a server, you can also use a more explicit way to access the other Mac. On the destination Mac in the Sharing preference pane, select File Sharing and note what it says below File Sharing: On. It will read something like:
Other users can access shared folders on this computer, and administrators all volumes, at “afp://10.0.1.101” or “smb://10.0.1.101”.
Instead of steps 1 and 2 above, perform these steps:
- In the Finder, choose Go > Connect to Server (Command-K).
- In the Server Address field, type in the sharing information above, like
afp://10.0.1.101and click Connect.
You should now be able to follow steps 3 to 5 above. Everything else is now automatic: macOS creates the necessary subfolders and other details on the external drive to keep backups separate.
Ask Mac 911
We’ve compiled a list of the questions we get asked most frequently along with answers and links to columns: read our super FAQ to see if your question is covered. If not, we’re always looking for new problems to solve! Email yours to mac911@macworld.com including screen captures as appropriate. Mac 911 can’t reply to—nor publish an answer to—every question, and we don’t provide direct troubleshooting advice.