

What to do when your two-step Apple ID account is locked

I woke up on a Friday morning, groggy with allergies, a mild cold, and a message on my iPhone. I needed to enter my password to proceed. I did so, but only after checking that it wasn’t some kind of phishing message—the message was generated on the home screen and using iOS, not in a browser or an app.
After entering my password, my iPhone said, “This Apple ID has been locked for security reasons.” I needed to go through an unlock process. I presume my account was locked because someone had attempted to lock in and had too many password failures.
Apple warns you when it’s locked your account.
That involved received a text on a trusted device and entering a Recovery Key, as this Apple ID account was still using Apple’s legacy two-step verification, a method they have since required everyone upgrade from—unless you’re using your Apple ID effectively only for purchases. If you ever log in with an Apple ID with two-step for iCloud use on an iOS device or a Mac, the account is automatically upgraded in High Sierra (macOS 10.13) and iOS 11 to the newer, more-robust two-factor authentication (2FA).
However, I was still living in the past for reasons that date back to Mac.com. At one point, it made some sense to have two separate accounts, and since that stopped being the case, Apple has provided no way to merge purchases, data, and other records.
My unlock efforts worked, and I resumed access to that account. That was in part because I’d done a reasonable amount of preparation in case this ever happened. But I decided afterwards I should migrate to eliminate this situation in the future.
(Bad logins are unfortunately also a way people may be harassed, with automated attempts to break in that let a malicious or criminal party deny someone access to their account. Apple seems to have ways to throttle and deal with this, however, because otherwise it would happen constantly to many users.)
How I prepped
Two-step verification. I preach the technogospel of setting up accounts to require a second factor for any services that offer it. This requires not just that someone obtain your password or guess it, but that they also possess access to one of your unlocked devices or can hijack your telephone number. Those aren’t trivial for the vast, vast majority of all account-grabbing attempts.
My iCloud account was already set to Apple’s 2FA, but my App Store-only account remained on two step. That’s still better than password-only account protection.
Even if you have two-step or 2FA enabled, log into the Apple ID site, and confirm that you know which iOS devices, Macs, and phone numbers are trusted for your account.
Recovery Key. Not everybody has one. Two-step verification includes a Recovery Key, and you typically need two of the following to unlock or recover an account: your password, a trusted device or phone number, and the Recovery Key. If your account is reset, you may need both a trusted device or phone number and the Recovery Key, so losing the Recovery Key can be a real problem. (You may also have a Recovery Key if you were still using two-step verification when you upgraded to iOS 11 or macOS 10.13 High Sierra as noted above: when Apple automatically switched you to 2FA, the Recovery Key option remains in your account.)
When the Recovery Key is created, you have to write it down or make a note in a password-management app. I had fortunately done so, and had ready access to it. When prompted during the unlock process, I was able to type it in. The Recovery Key field can’t accept a “paste,” however: even if you have it stored in 1Password, LastPass, or another manager, you’ll have to write it down and then tap it in.
Can’t make a Recovery Key? If your Apple ID account doesn’t let you create one or you can’t find yours, you have to talk to Apple to further prove your identity. In some cases, Apple may not accept your proof, and you might loose access to your account permanently. This is why it’s vitally important to keep a backup email address, phone number or numbers, and other information up to date at the Apple ID site.
The aftermath
After unlocking my account, I had to create a new password. My previous password was 14 characters long and a random salad of uppercase, lowercase, symbols, and numbers—extremely hard to type in. I switched to a much-longer password generated in 1Password composed entirely of words.
Apple didn’t like that: it said they were weak, and demanded a digit and an uppercase letter. I obliged, but that barely makes them stronger. This outdated advice contradicts the National Institute of Standards and Technology’s best-practices report from last year, and the routine guidance of security researchers: a long, memorable, easy-to-type password of random words is far better than a short, painful-to-enter, complicated one.
While I could have regenerated my Recovery Key, I opted to upgrade to 2FA. Because this Apple ID wasn’t connected to iCloud on any Mac or iOS device, I had to pick a less-used piece of hardware to switch over. I have an iPad I don’t use much, I logged in there. First, I disabled two-step verification, so I wasn’t tied to the old system. Then I enabled 2FA from the iPad to have a clean start.
I’ve associated trusted phone numbers with the Apple ID account, which means that I can remove the Apple ID from the iPad now and replace it with my more common iCloud-connected Apple ID, and still be able to perform 2FA verification via a text message to my phone.
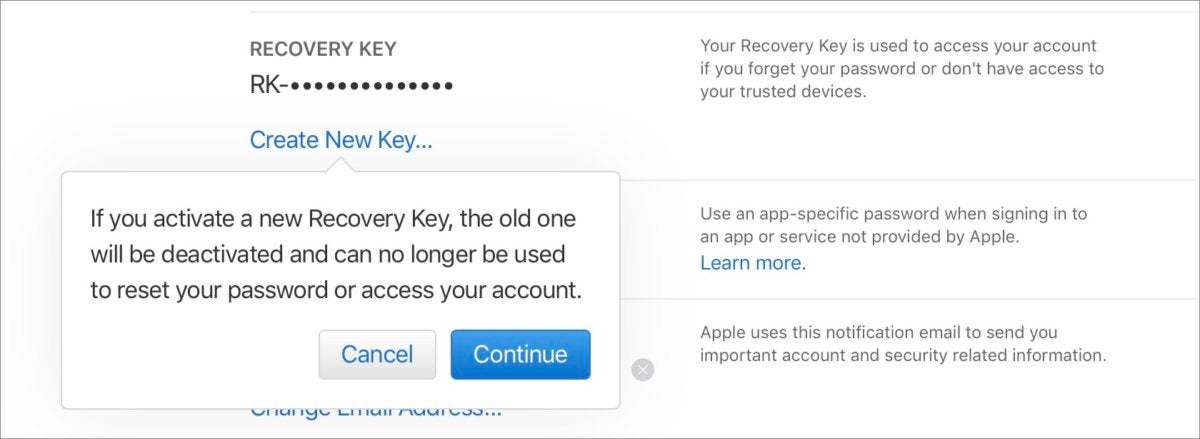
If you want, instead, to remain using two-step verification, reset your Recovery Key since it’s been used:
- Go to the Apple ID site.
- Click on Edit next to the Security area.
- Click create New Key under Recovery Key.
You can’t copy the Recovery Key, so write it down carefully or type it into a password manager. Apple requires that you re-enter it correctly before it’s set.
 IDG
IDGYou can choose to reset your Recovery Key, advisable after you’ve had to unlock your account.
Ask Mac 911
We’ve compiled a list of the questions we get asked most frequently along with answers and links to columns: read our super FAQ to see if your question is covered. If not, we’re always looking for new problems to solve! Email yours to mac911@macworld.com including screen captures as appropriate, and whether you want your full name used. Every question won’t be answered, we don’t reply to email, and we cannot provide direct troubleshooting advice.